
Why to Wait to Plant Tomatoes (and Other Summer Vegetables)

If there’s one constant in gardening, it’s that gardeners love their tomatoes with a passion. Gardeners also love getting that first ripe tomato as early as possible. Long-time vegetable gardeners have been burned enough times by trying to plant early that most won’t try it without protection*. If you’re a newer vegetable gardener, we’ll save you some grief by explaining why you shouldn’t plant your summer veggies too early-even if you see them available for sale.
The traditional last frost date here in the Triad is approximately April 15 (some resources put it at April 22, which just shows how vague the date really is). This means that there is “only” a 10% chance of a frost after this date. Note that there is no guarantee that there will be no frost after this date! Warm soil temperatures are also important for keeping new vegetable transplants happy, and soil warms much more slowly than the air, so it takes more than a few nice days to get the soils nice and warm.
Like Christmas ornaments appearing in September, you will find a lot of tender plants available for sale at many stores far in advance of the frost date, including warm-loving plants like tomatoes, peppers, basil and summer blooming annuals and tropicals. Although we don’t bring some things in quite so early, New Garden will offer some tender plants for sale in advance of when they should actually be planted outdoors.
We also do our best to advise people on the best times to plant tender items. Let’s look at the garden favorite tomato as an example of why planting too early can lead to problems.
As of this writing (late March) we still do not stock tomatoes in our stores, despite the phone calls we get on every nice warm day asking if they are in yet. Tomatoes are very sensitive to frost and cool soil temperatures. One frosty night will reduce unprotected tomatoes to blackened mush. The roots of tomatoes are inactive at soils temperatures below 50F, neither growing nor supplying nutrients to the tomato plant. If the roots don’t grow, the plant doesn’t grow, and will just sit there waiting for warmer weather. Additionally, while in this state of suspended animation, tomatoes are susceptible to stress and disease and can wilt and die suddenly.
Tomatoes planted in soil closer to the ideal temperature of 70F will grow quickly, even outgrowing seedlings planted earlier in too-cool soil. Without the stress of spending a few weeks shivering in cold soil, you’ll ultimately have a stronger plant with better tomato production if you wait until the ideal planting time, sometime around April 15th to the 21st. This is the time that local farmers, whose livelihoods depend on a good harvest, will plant their tomato crops. You’ll still want to watch the weather that week to avoid surprise late frosts! Other vegetables that need to wait are peppers, eggplant, squash, and okra.
There are vegetables you can and should plant early. The entire cabbage family (including broccoli, cauliflower, collards, kale, Brussels sprouts, and kohlrabi), peas (from seed), radishes, carrots, lettuces & other leaf veggies all can be planted before warm weather, some as early as February! These vegetables are all tolerant of cold weather and need little protection unless freakishly cold weather threatens and will allow you to begin your healthy harvest early.
*What about that “protection”? Here are two easy ways to cheat the season by a few weeks:
Plant in containers. Container potting mixes warm more quickly than garden soil, and can be dragged into the garage or the living room if frost threatens.
Use a cloche made from glass (expensive but pretty!) or plastic gallon milk jugs with the bottoms cut out (cheap!) placed over the seedlings at night. Cloches act like mini-greenhouses, retaining soil warmth and protecting from light frosts. You must remember to remove the cloche on sunny days, however, or you’ll cook your tomatoes.

Getting rid of moss in your lawn can prove to be a tougher job than you might expect. It’s not as simple as adding grass seed and water because without managing some of the factors that encourage moss growth and inhibit grass growth, the moss will always win.
Just about every lawn has a low level of moss growing within it, hidden under the blades grass. If the grass is stressed and begins to thin or has difficulty establishing, the moss will take over and become more visible. Suddenly you have a moss “problem”.
Moss in the lawn is an indicator of several conditions that must be fixed before the area is more friendly to grass than moss. The conditions that stress grass and encourage moss are low fertility, poorly drained or wet soil, highly acidic soil, low mowing height, or low light levels. Often a combination of more than one factor is in place and multiple problems must be addressed.
Fixes range from simple (mowing height, fertility and acidity) to serious projects (low light or excess soil moisture). In some cases it is not practical or cost effective to fight moss, and learning to appreciate and encourage it, or forgo grass entirely and use mulch or hardscaping may be the best solution.
First determine exactly conditions exist in your lawn that may be making it difficult for grass to grow and what you need to do to change them. (You can get pH tests done by your county Cooperative Extension, and most cases for free. You can pick up sample boxes at New Garden) You may find that several factors are causing your moss problem. In many cases, regular aeration and correct application of fertilizer and lime can reduce moss issues. Aeration loosens compacted soil, allowing water to drain and grass roots to fill in. Fertilizer and lime encourages grass growth and stresses the moss, giving the grass the upper hand in the competition.
If you mow your lawn very short (under 3 ½ inches for fescue and under 1 ½ inches for bermudagrass) STOP! Keeping grass blades too short reduces the amount of energy they can get from sunlight and gradually weakens the grass. Weak grass allows moss to take over when other conditions are right.
The most difficult problems to address are low light levels and low-lying wet areas with poor drainage. “Limbing up” trees may help brighten the area somewhat, but to get enough sun you may have to remove entire trees. Of course if your house is causing the shade your options are limited. Low wet areas may require some grading to address drainage issues. In these instances accepting the moss, mulching, or installing a shade garden may be more practical solutions.
If you decide to forget the grass and encourage the moss (No mowing! No fertilizing!), lower the pH to around 5.0 with sulfur and make a moss smoothie to spread in areas you want moss to fill in: Place about two cups of healthy moss in a blender with two cups of water and half a cup of beer or buttermilk. Pulse a few times to break up the moss - you want it to stay somewhat chunky. Spread the mixture where you want moss to grow, preferably on a cloudy or drizzly day. Keep the area moist-to-wet until the moss establishes.
Will my Hydrangea Bloom This Year?

Big leaf hydrangeas (Hydrangea macrophylla) are widely popular flowering shrubs. Their large, colorful, and long lasting blooms in early summer are a staple in many semi-shady gardens. Unfortunately, they can be susceptible to cold damage in winter that affects their ability to flower. We are getting lots of questions about hydrangeas blooming after a cold period that we’ll try to answer here.
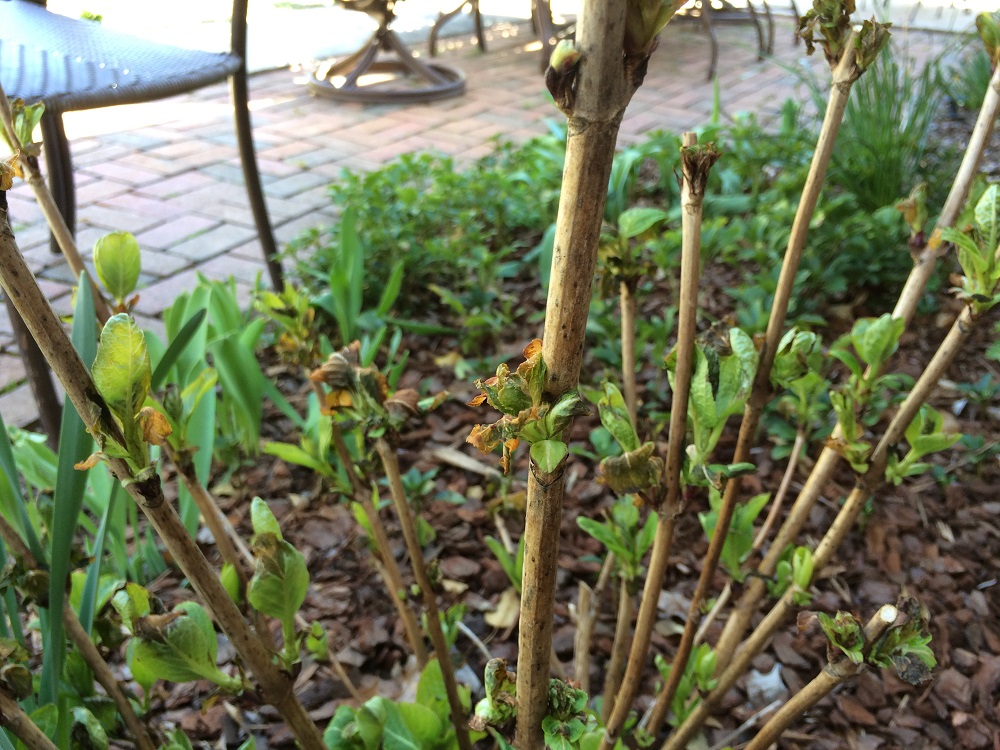
This winter produced a few nights of temperatures cold enough to damage a lot of hardy plants. It also gave us a recent hard freeze that occurred after hydrangea buds began to grow. One consequence of the cold temperatures will undoubtedly be some hydrangeas blooming poorly or not at all.
Like azaleas and rhododendrons, big leaf hydrangeas bloom on what is known as “old” wood, or wood that grew on the shrub last year. The flower buds are formed late in the previous season on this old wood, although you can’t see them. Unlike azaleas and rhododendrons, which are extremely hardy, the top growth of hydrangeas is susceptible to winter damage. If the hydrangea is frozen to the ground (and is a non-reblooming variety) you’ll lose the flowers for that year. On newer reblooming varieties like ‘Endless Summer’ and ‘Blushing Bride’, buds can also form on new wood, so even if frozen to the ground, these types will produce flowers for this season.
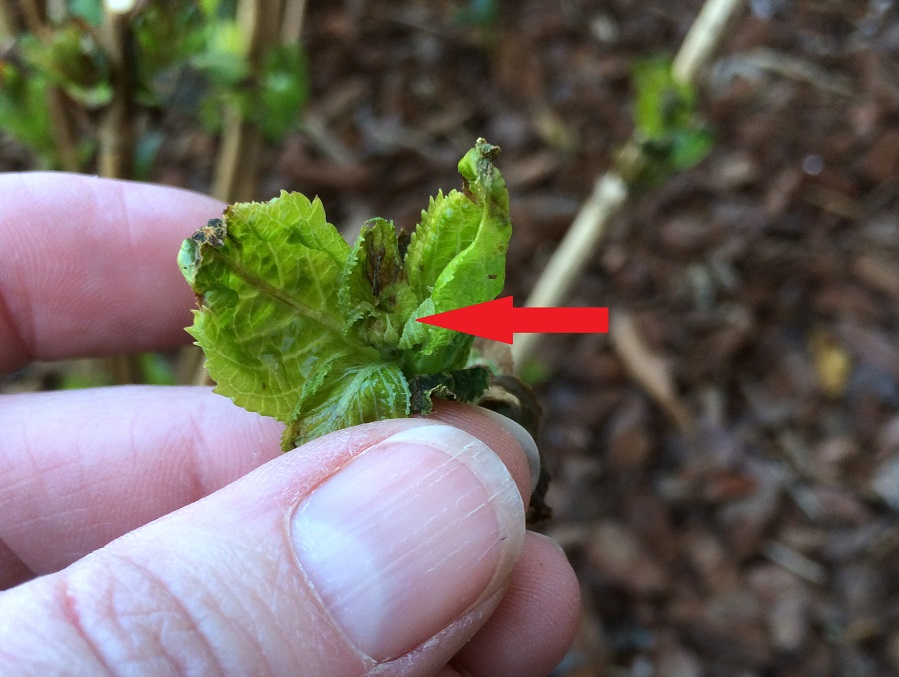
Deep freezes in winter or late freezes in early spring can also damage the already-formed buds on hydrangeas, even if the woody stems survive. If you examine the buds along the branch you should be able to tell if they are completely mushy (flower bud probably killed), or just tip burned (bud may have survived). Once these buds are damaged on older hydrangea varieties, the hydrangea can’t produce new buds for this season, and though the shrub may still grow nicely, it will not bloom much if at all.

Not every hydrangea will react the same to a freeze. Some are planted in more sheltered areas, some are genetically tougher, so your hydrangea may suffer heavy bud loss while your neighbor’s manages to keep a few blooms. If you have a reblooming variety it will still flower this year even if all the buds on the stems are damaged, just a little later.
This formation of buds on old wood is also why older hydrangea varieties that are pruned incorrectly in late summer or fall may not bloom the following year. Here’s how to correctly prune a big leaf hydrangea.
Hydrangeas do not usually need yearly pruning. Some of the most beautifully blooming hydrangeas I've ever seen are obviously completely ignored and never pruned at all.
If you need to prune regularly to keep the hydrangea small enough for the space it’s in, you may have chosen the wrong variety for the location. Consider replacing with a smaller growing cultivar.
In spring after leaves have begun to expand and preferably after frost danger has passed, trim back any damaged or dead branch tips to a set of healthy leafy buds. These are the buds that should develop into flowers later. Waiting until buds swell and unfold will show you exactly how far back any winter damage occurred, as damaged buds will not grow. Also remove any broken or crossing branches. Most years this may be all the pruning you do.
Once the shrub is several years old, thin (if needed) by removing older, longer stems to the ground in spring. Do not remove more than 1/3 of the shrub’s branches in a single season.
If size control is needed, you can shorten branches immediately after bloom when the flowers begin to fade. You can also do this when cutting the flowers for arrangements. Reblooming hydrangeas can be shaped in summer and will often set another flush of blooms.
Some people like to leave hydrangea flowers to dry on the plant. The blooms will fade through several colors, finally ending up as buff-colored, papery dry flowers that make nice winter interest. If you remove these dried flowers, remove only the little bit of stem directly attached to the flower. Cutting further back into the branch will remove some of the next season’s buds.
No article about big leaf hydrangeas can be written without talking about color! As long as your Hydrangea macrophylla is not a white flowered variety, you can make the blooms blue by lowering the soil pH with acidic applications (fertilize with HollyTone or use Espoma soil acidifier or aluminum sulfate) or pink by raising the soil pH (add lime, or use high phosphorus fertilizers). Be sure to check product label for specific application rates.